Best Screen Recording Software: What to Look For in 2026
Most people think a screen recorder is just a tool that captures your screen. And if screen recorders are that simple, why bother paying for a good one?
If you are just recording a quick 2-minute "how-to" for a coworker, a basic tool is probably fine.
But if you are a content creator, an online course instructor, or a YouTuber, a "basic" recorder is a massive liability. Most screen recording software is built for simple one-off use cases, not for content creation.
I am a content creator who uses screen recording software every single day. I know exactly what is important and what is not.
Here is my definitive checklist of what makes the best screen recording software in 2026.
Quick Answer: What Is the Best Screen Recording Software in 2026?
For content creators, YouTubers, and online course instructors, the best screen recording software in 2026 is one that records multi-track audio (mic, system audio, screen, and webcam as separate files), captures native system audio on both Mac and PC without drivers, exports at 192kbps, and runs in the browser to eliminate audio drift.
Tools like QuickTime, Canva, Loom, Riverside, and Descript all fail at least one of these criteria. Podsplice is the only browser-native tool that passes all 8 checks below.
The 8-Point Checklist for an Ideal Screen Recorder
1. Multi-Track Isolation (Stop "Audio Smushing")
Most screen recorders take your microphone voice and the sound coming from your computer (system audio) and merge them into one single file. In the audio world, this is called "Single-Track Compression" or "Audio Smushing."
To prevent the file from distorting, the software automatically lowers the volume of both sources, leaving you with a weak, muffled recording.
If you are reacting to a YouTube video, and the YouTube video you are reacting to is too loud, it drowns out your voice forever. You cannot fix it. It's like trying to unscramble an egg.
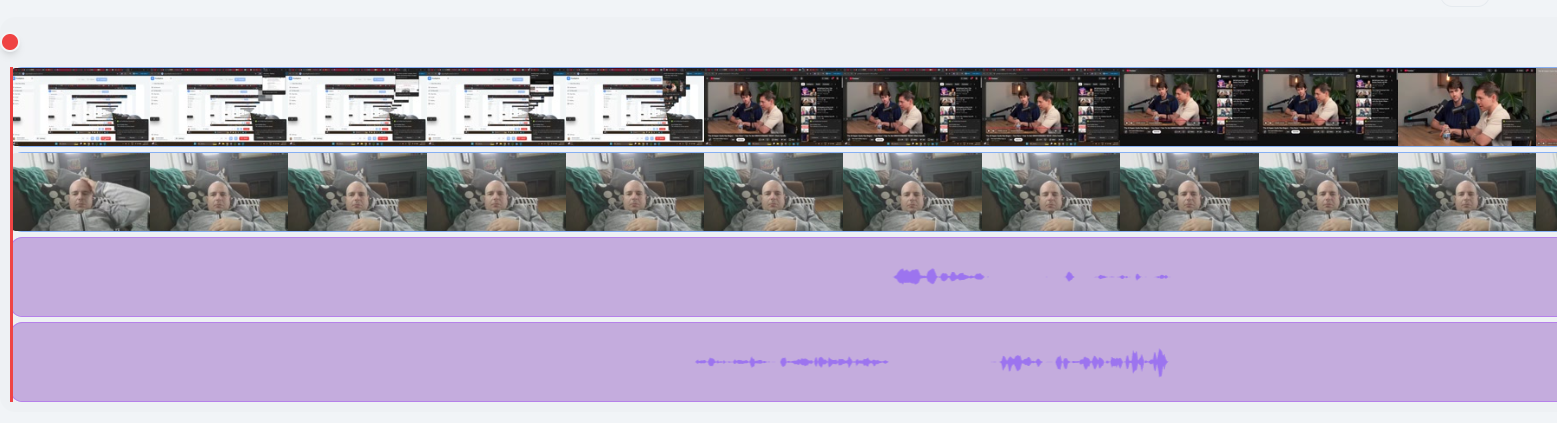
Professional screen recording software uses Multi-Track Isolation. It records your microphone, your system audio, and your webcam onto completely separate digital tracks — four clean files, not one flat mix.
The four tracks a professional screen recorder should deliver:
Track 1: Screen Capture (the visual of what is on your screen)
Track 2: Webcam Video (isolated so you can reposition it in editing)
Track 3: Microphone Audio (isolated, high-bitrate voice)
Track 4: System Audio (the internal sound from the video, game, or app)
This multi-track recording is huge for me. I have several different YouTube reaction channels. I need to have my mic audio and the system audio (sound coming from the YouTube video) as separate files. This is the only way to make high quality reaction videos.
Learn more about a screen recorder with separate audio tracks.
2. Native System Audio Capture
This is the most common failure point in screen recording software, and it catches creators off-guard every time.
Most screen recording software fails at one critical task: recording the actual sound coming from your computer.
"Computer sound", "System audio", and "Internal audio" all mean the same thing.
They are the sounds that come from your computer. For example, if you are reacting to a YouTube video, most screen recorders will record your voice (your mic) and the visual part of the YouTube video, but the audio from the YouTube video will be completely silent.
Most screen recorders record your screen (but not the audio from the screen). This was shocking to me when I first found out about this (the hard way).
If you use standard tools like Canva, Descript, Riverside, or Loom to react to a YouTube video, your final recording will be completely silent except for your microphone. The YouTube video will play on screen — your viewer will see it — but there will be zero audio from it.
The old workaround is painful. To fix this, older recorders force users to download a complex third-party "virtual audio driver". For Mac users, it was software (like BlackHole or Soundflower), manually route audio through the macOS Audio MIDI Setup panel, and hope the configuration does not break their system volume keys. It is a fragile, technical process that breaks between macOS updates.
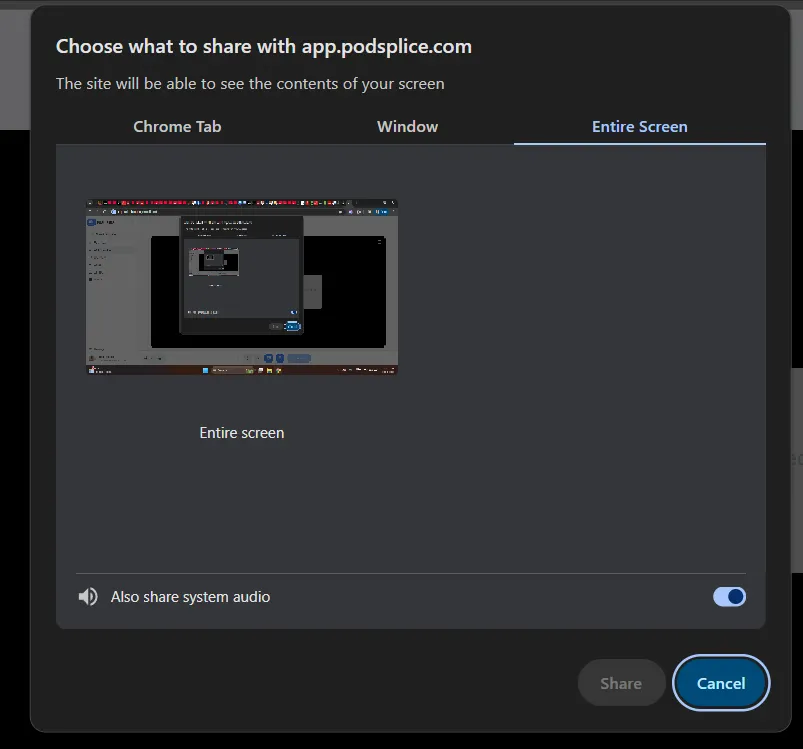
The modern solution is the Browser Loophole. The best screen recorders capture "Native System Audio" directly from the browser engine — no downloads, no admin passwords, no virtual drivers.
Think of it as the "Gmail moment" for screen recording: instead of configuring an SMTP server, you just open a website and it works. The browser has already negotiated the security protocols with the OS so you don't have to.
Why it matters: If you record reaction videos, gameplay commentary, tutorial presentations, or remote podcasts, system audio is not optional — it is the entire point. A recorder that cannot capture system audio on both Mac and PC without a setup tutorial is not a professional tool.
Podsplice lets you record system audio with one click.
3. High-Fidelity Audio (Escape the 64kbps Trap)
Many free and mid-tier tools fall into what audio engineers call "The 64kbps Trap." They compress your audio to an extremely low bitrate to keep file sizes small, throwing away the warmth and depth of your voice. The final result sounds thin, distant, "crunchy," and robotic — the hallmark of a cheap screen recording.
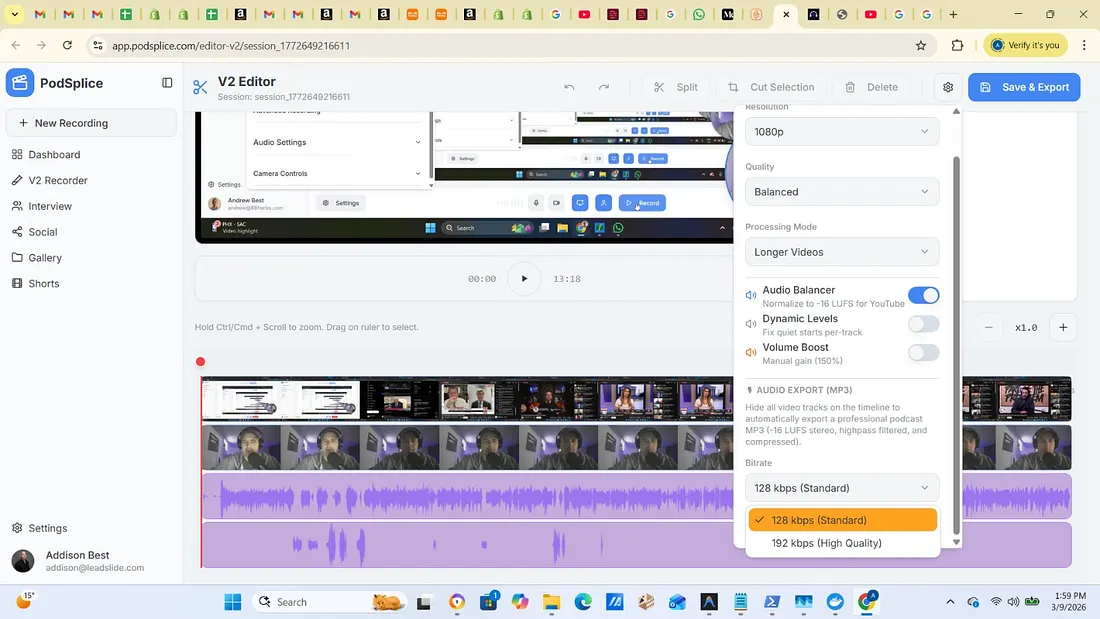
The professional gold standard is 192kbps. At this bitrate, the richness and warmth of your voice are fully preserved. Your listeners on YouTube, Udemy, or Apple Podcasts hear the difference immediately.
Remember, just because a screen recorder says it "records your microphone", it doesn't mean it records a high-quality version of it.
Beyond bitrate, professional screen recording software applies a two-step automatic audio processing chain:
True Peak Limiting (set to -1.0 dB): If you laugh loudly or clap near the mic, the sudden volume spike — called a "Peak" — hits the digital ceiling (0 dB) and causes "clipping." A True Peak Limiter acts as a soft foam bumper on that ceiling, catching spikes before they distort.
Loudness Normalization (to -16 LUFS): Once the peaks are controlled, the entire recording is raised to -16 LUFS — the industry standard target for YouTube, Spotify, and Apple Podcasts. This ensures your video sounds perfectly leveled on every platform.
Why it matters: The processing chain is not optional polish. It is what separates a recording that sounds like a studio from one that sounds like a basement.
Here is a screenshot showing Podsplice records your voice in high-quality 192 kbps.
4. Browser-Native Architecture (Drift-Free and Universal)
Historically, to get high-end recording features, you had to download massive desktop applications like OBS Studio. These apps are heavy, consume significant RAM, and are prone to a well-known problem called "Audio Drift."
Don't overcomplicate this in your mind. Think about Gmail. It works in your browser. You can access your Gmail from any computer. You don't need to download anything to use it because it works right in your browser tab. Gmail doesn't slow down your computer, and it is super easy to use.
For the "audio drift" part, this is another huge deal.
If you are using downloaded software like OBS, by the 30-minute mark of a long recording, your lips are visibly out of sync with your voice. The only fix is to manually nudge your audio tracks in your editor. Browser-native architecture solves this through:
Master Clock Sync: The recorder assigns a "Universal Timestamp" from the Browser's Master Media Clock to every single frame. This anchors audio to video with mathematical precision.
Constant Frame Rate (CFR) Export: The output files use a rock-solid CFR standard, which means they drag directly into any Non-Linear Editor (NLE) — Premiere Pro, Final Cut Pro, DaVinci Resolve — with perfect sync.
Additional advantages:
Universal compatibility: Works on Mac Studio, Windows PC, or Chromebook.
Zero installation: No downloads or driver conflicts.
Cloud rendering: Heavy processing happens in the cloud, keeping your computer fast during the recording.
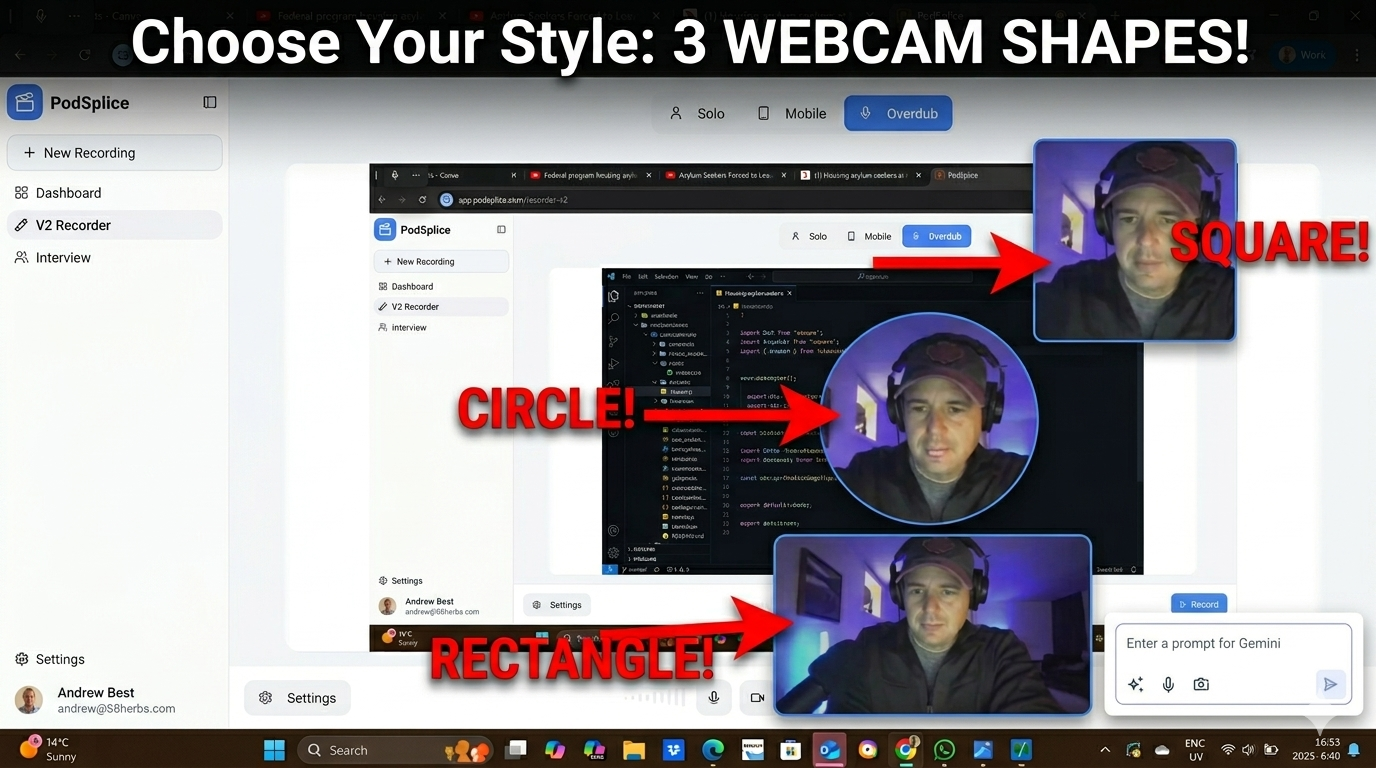
5. Can Move, Resize, and Reshape the Webcam Thumbnail image (Circle, Square, Rectangle, or Remove for "Faceless")
Most screen recorders record your face through your webcam in a very rigid way. Not only do they combine all the files together, they don't let you choose the size, shape, and location of your webcam thumbnail video.
Podsplice lets you choose your webcam recording size, shape, and location.
Here are the different webcam face views (circle, square, and rectangle) I put them all in one screenshot so you can see how they look.
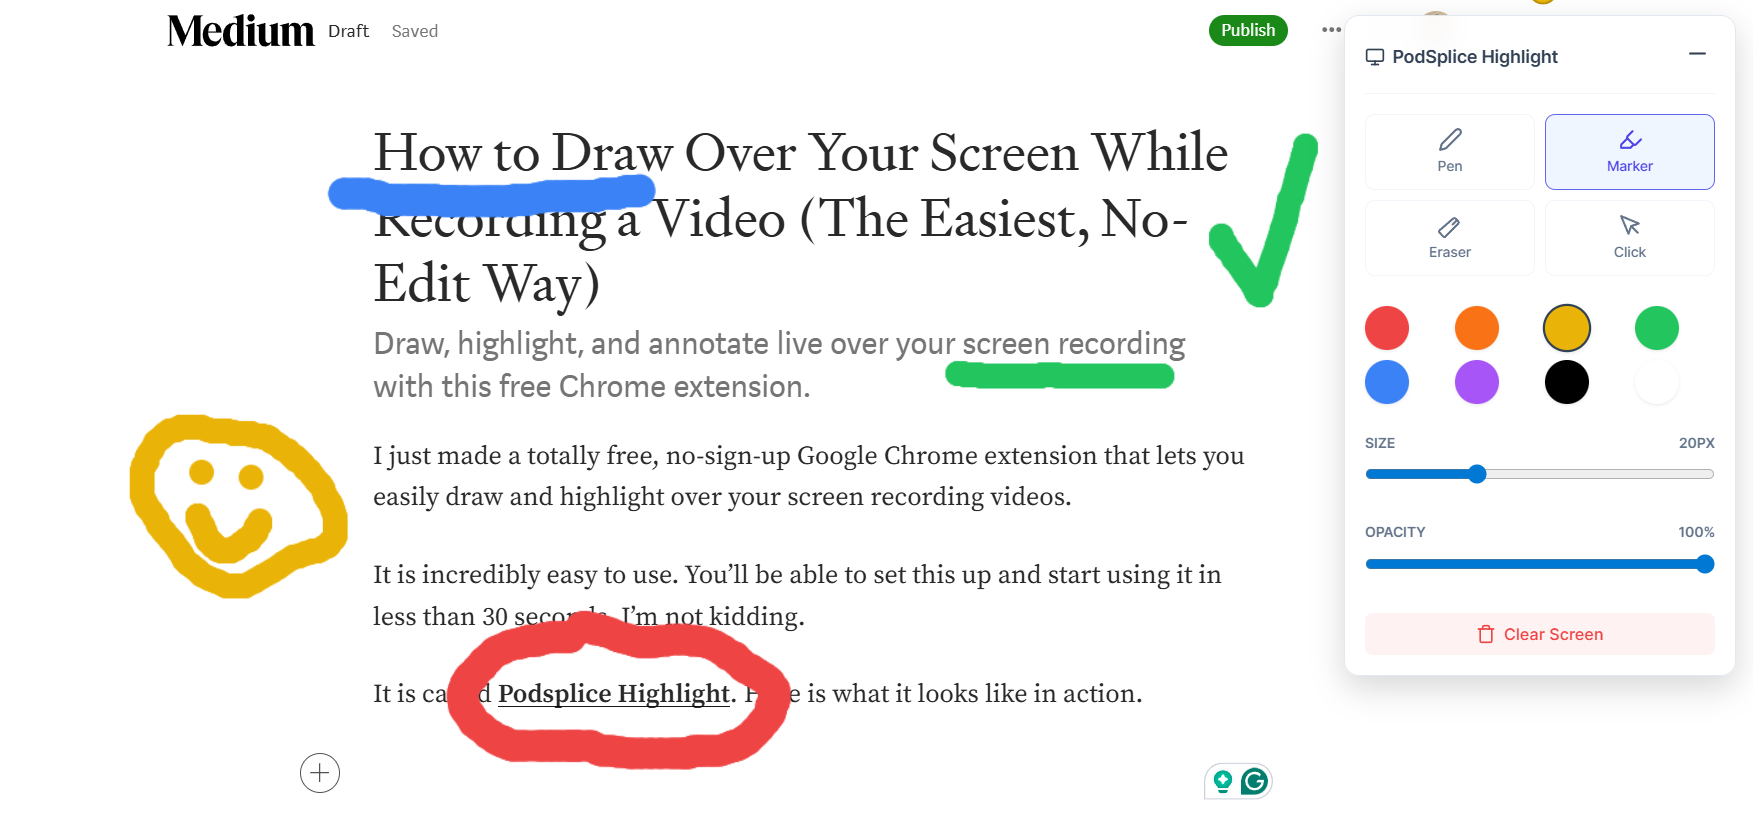
6. Can Draw, Highlight, and Annotate on Top of a Live Screen Recording Video (Not in Post-Production)
The easiest way to draw and highlight during your course video or lesson is to use the Podsplice HIghlight Google Chrome extension. It is totally free, and you don't even need to put your email in to sign up.
Here is a screenshot of how Podsplice Highlight markings would look (I love it for my reaction videos)
7. Double-Ender Remote Recording (Cloud-Backed and Crash-Proof)
Podsplice is also a lot more than just a screen recorder. It even records remote podcasts. It also lets you share your screen and system audio with your remote guest, so you and your guest can react to a video or whatever is on your screen together.
Traditional desktop recorders save files directly to your local hard drive. This creates two serious risks:
Crash risk: If your computer crashes mid-recording, you lose everything.
Internet dependency: A weak Wi-Fi connection will degrade your remote guest's audio and video quality in real time.
Even if the internet connection is perfect, recording audio through the internet is lower than recording it directly on your computer. It's like why Netflix has better audio than the sound coming out of your phone during a phone call (even if the connection is good)
Professional screen recorders use "Double-Ender" technology. Each participant's audio and video are recorded locally on their own device at full quality, then synced in the cloud.
Practical benefits:
Crash protection: Local recording combined with simultaneous cloud streaming means your data is safe even if the computer dies.
Location-independent quality: Guests on coffee-shop Wi-Fi still sound like they are in a studio.
Seamless device switching: Record on a travel laptop; edit on your desktop workstation later.
8. NLE-Ready Exports and High-DPI Video
Most generic recorders produce a single, compressed, flat file using Chroma Subsampling (4:2:0), which makes text and code look soft and blurry.
On the video side:
High-DPI logical pixel capture: Captures pixels directly from the browser engine to preserve sharpness on Retina or 4K displays.
4K resolution support: YouTube's algorithm gives measurably more visibility to 4K uploads.
Constant Frame Rate (CFR) output: Guaranteed sync in every major NLE.
On the audio side:
Uncompressed separate track downloads: Each of the four tracks is downloadable as a separate, uncompressed file.
Automatic LUFS normalization: Pre-normalized to -16 LUFS for instant publishing.
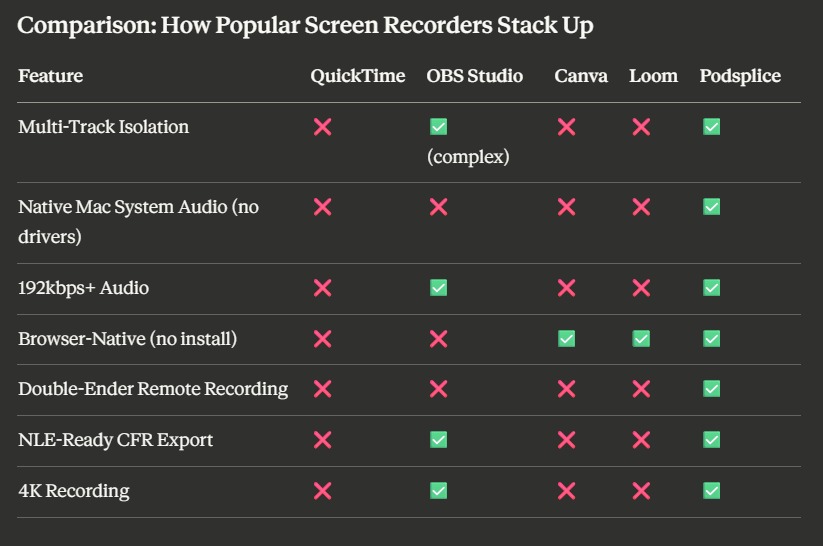
Comparison: How Popular Screen Recorders Stack Up
| Feature | QuickTime | OBS Studio | Canva | Loom | Podsplice |
|---|---|---|---|---|---|
| Multi-Track Isolation | ❌ | ✅ (complex) | ❌ | ❌ | ✅ |
| Native Mac System Audio (no drivers) | ❌ | ❌ | ❌ | ❌ | ✅ |
| 192kbps+ Audio | ❌ | ✅ | ❌ | ❌ | ✅ |
| Browser-Native (no install) | ❌ | ❌ | ✅ | ✅ | ✅ |
| Double-Ender Remote Recording | ❌ | ❌ | ❌ | ❌ | ✅ |
| NLE-Ready CFR Export | ❌ | ✅ | ❌ | ❌ | ✅ |
| 4K Recording | ❌ | ✅ | ❌ | ❌ | ✅ |
Frequently Asked Questions
What is the best free screen recorder with system audio?
Podsplice is the best screen recorder with system audio. Most free screen recorders — including QuickTime, Canva, Descript, Riverside, and Loom — cannot capture system audio at all. Podsplice is the most capable option for creators who need system audio.
How do I record a YouTube reaction video with audio?
You need a recorder that captures system audio as a separate track from your mic. Using Podsplice, the YouTube audio and your voice are stored as separate tracks you can mix independently in post-production.
Why does my Mac screen recording have no sound?
macOS security restrictions block most apps from accessing internal audio. The fix is to use a browser-native recorder like Podsplice, which uses the browser's built-in permissions to capture system audio without drivers.
What is the best screen recorder for online courses?
Podsplice. For creators on Udemy or Coursera, the best recorder is one that exports high-bitrate audio (192kbps+), auto-normalizes to -16 LUFS, and provides high-DPI video to keep text and code crisp.
The Bottom Line
If you are evaluating screen recording software in 2026, use this 6-point checklist. If a tool cannot pass all six, you are going to spend hours fixing bad recordings instead of growing your channel.
We built a tool that checks every single one of these boxes. Try Podsplice Today.

About the Author
Andrew Best
Andrew Best is an entrepreneur, educator, and AI expert with over two decades in online marketing. He co-founded China232 — a podcast and learning platform with 10M+ downloads — and later 88Herbs, a premium supplement company. Andrew now focuses on helping creators leverage AI for podcasting, screen recording, and YouTube content through Podsplice.
More from Podsplice
Why Your Screen Recording Audio Sounds Bad (Even With a Great Mic)
Blog
How to Start a Faceless YouTube Channel Without AI (2026 Guide)
Article
The Easiest Alternative to OBS for Screen Recording
Blog
Best Screen Recorder for Mortgage Brokers: Record Loan Walkthroughs, Podcasts, and Social Clips
Article
Best Browser-Based Screen Recorder (No Download, No Setup)
Blog
Start Recording in Seconds
No downloads. No setup. Just hit record and share your story with the world in studio quality.
Looking for a Screen Recorder or Remote Recording tool?